RV1126b只读bulidroot文件系统支持ssh功能
内核版本:6.1
系统:只读bulidroot
1、遇到问题
使用rk原厂sdk包 ,实现rv1126b适配的快启,bulidroot文件系统为增强型只读的,开启ssh功能无法生成私钥 ,导致功能异常。报错截图如下所示:

2、解决办法
2.1 menuconfig启动构建时生成密钥
进入 Target packages -> Networking applications -> openssh
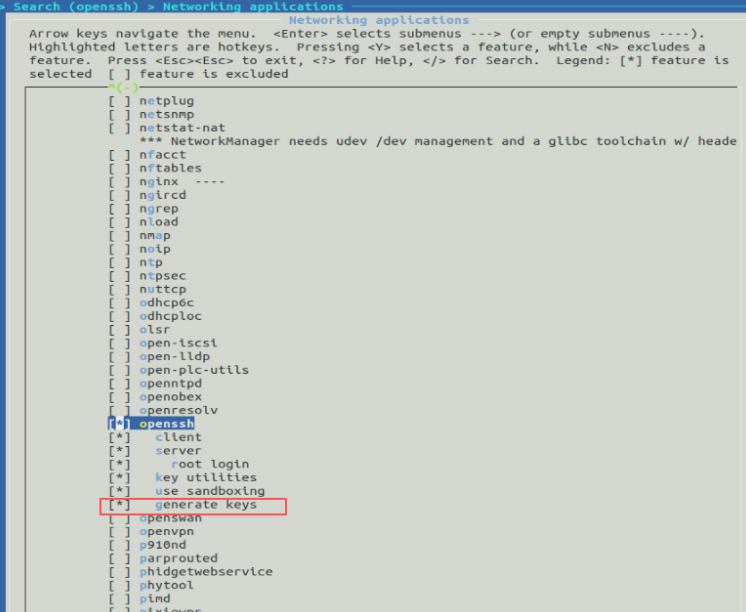
选择后保存,可以整体编译或者局部编译openssh
make menuconfig

make savedefconfig
//保存并重新编译
make openssh-rebuild
2.2 配置必要的运行时目录
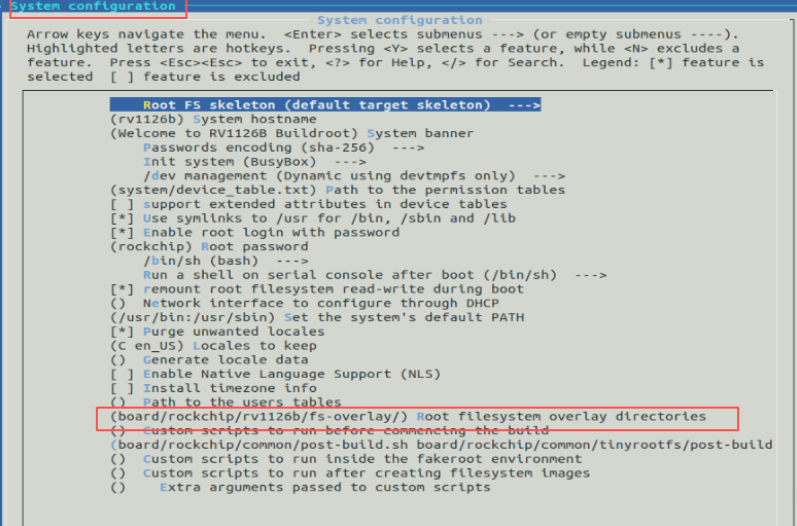
- 构建时修改:在 Buildroot 中,将该文件的修改放在
board/路径下。这样它会自动覆盖打包进镜像。/ /rootfs-overlay/etc/ssh/sshd_config - 确认overlay路径:进入System configuration --->Root filesystem overlay directories
fs-overlay/
            └── etc/
                ├── ssh/
                │   └── sshd_config      # SSH 主配置文件
                └── init.d/
                    ├── S40sshd_setup    # SSH 环境设置脚本
以上为整理配置结构,需要先新建对应目录,使用命令如下:
mkdir -p fs-overlay/etc/ssh
mkdir -p fs-overlay/etc/init.d
2.2.1 配置sshd_config文件
vim sshd_config
# OpenSSH精简配置 - 兼容嵌入式系统
Port 22
AddressFamily inet
ListenAddress 0.0.0.0

# 主机密钥路径
HostKey /etc/ssh/ssh_host_rsa_key
HostKey /etc/ssh/ssh_host_ecdsa_key
HostKey /etc/ssh/ssh_host_ed25519_key

# 认证设置
PermitRootLogin yes
PasswordAuthentication yes
PubkeyAuthentication yes
PermitEmptyPasswords no

# 禁用不支持的功能
# PrintLastLog no    # 注释掉,旧版本不支持
# UsePAM no          # 注释掉,Buildroot通常不启用PAM
ChallengeResponseAuthentication no
UsePrivilegeSeparation yes

# 日志
SyslogFacility AUTH
LogLevel INFO

# 客户端保活
ClientAliveInterval 30
ClientAliveCountMax 3

# 禁用不必要功能
X11Forwarding no
PrintMotd no

# 子系统
Subsystem sftp /usr/libexec/sftp-server

# 性能优化
UseDNS no
Compression delayed
2.2.2 创建启动脚本S40sshd_setup
vim  S40sshd_setup
chmod +x  S40sshd_setup
#!/bin/sh
# S40sshd_setup - 在SSH服务启动前设置环境

case "$1" in
  start)
    echo "Setting up SSH environment (before sshd starts)..."

    # 1. 创建必需目录(必须在ssh服务启动前完成)

    # 2. 检查主机密钥是否存在
    echo "Checking SSH host keys..."
    if [ ! -f /etc/ssh/ssh_host_rsa_key ]; then
        echo "ERROR: SSH host keys not found in /etc/ssh/"
        echo "Make sure 'install server keys' is enabled in Buildroot"
        # 不要尝试生成密钥,因为文件系统只读
    else
        echo "SSH host keys found, setting permissions..."
        # 设置正确的权限
        chmod 600 /etc/ssh/ssh_host_*_key 2>/dev/null || true
        chmod 644 /etc/ssh/ssh_host_*_key.pub 2>/dev/null || true
        chmod 755 /etc/ssh 2>/dev/null || true
    fi

    # 3. 确保运行时目录存在
    mkdir -p /var/run/sshd
    mkdir -p /var/lock/subsys

    echo "SSH environment setup complete."
    ;;
  stop)
    # 停止时无需特别操作
    ;;
  *)
    echo "Usage: $0 {start|stop}"
    exit 1
    ;;
esac

exit 0
~
以上配置好后,需要编译打包进文件系统
./build.sh rootfs
./build.sh firmware
3、调试验证
编译后的系统烧写到板卡上,查看启动log或者使用ps查看进程情况

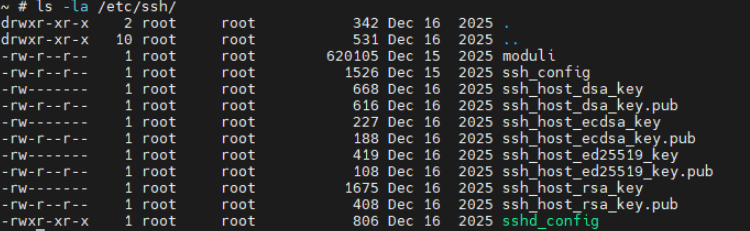
检查密钥
ls -la /etc/ssh/
hexdump -C /etc/ssh/ssh_host_rsa_key | head -5
使用winscp客户端验证,输入自己设置的用户名和密码

原文地址: https://www.cveoy.top/t/topic/qGzW 著作权归作者所有。请勿转载和采集!